
Extreme sports fans and outdoor enthusiasts alike will find that GoPro cameras are ready for anything and everything to record the most exciting moments and then watch them again at home alone or with friends.
GoPro cameras have evolved over the years and now offer all the features you need to record your most adventurous memories. However, it's not enough to just turn on and record to get quality, if not professional-grade footage. A few tips can help you improve your filming technique, such as setting the best field of view for different situations, or setting the right frame rate for slow-motion (or fast-motion) movies. Without forgetting that some ad hoc accessories can make a big difference in some situations.
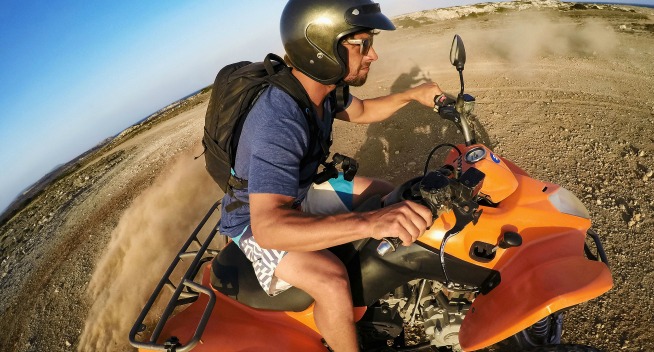
Watch out for the field of view
If your helmet is obscuring 90% of the GoPro's field of view, especially if you're not using a built-in display, you might want to notice it before you've spent half a day kayaking. It is advisable, therefore, to do a short test recording first to make sure everything is ok. If you want to use your GoPro to take photos without the screen, install the GoPro app - available for iOS and Android - to preview the field of view and direction of the lens before you start shooting.
You Can Be Filmmakers
GoPro's are famous for their wide-angle lenses, but a 170-degree field of view isn't always the right perspective. Some models allow you - for certain specific resolutions - to choose a different field of view, such as going from medium (127 degrees) to narrow (90 degrees) if needed. You don't have to be an experienced filmmaker to understand that a narrower field of view provides a more focused shot of the action. If you own the new GoPro Hero 5, you have a great ally on your side: the function that completely eliminates fish-eye distortion.
Capturing the Moment from a Video
GoPro's are primarily camcorders, but they don't do too badly as cameras either. Switching, however, from video to photo mode can prove a bit laborious. But, thankfully, it gets a lot easier by using a special smartphone app (Android or iOS) that lets you capture screenshots from a video, or resort to Quik on your computer. Basta aprire il filmato, scorrerlo fotogramma per fotogramma e catturare proprio quell’istante che si aveva in mente.
Funzione per veri professionisti
I modelli GoPro di fascia alta come le videocamere Hero5, Hero4 and Hero3 integrano una caratteristica chiamata Protune che, se usata da un professionista, consente di impostare alcune funzioni quali la risoluzione video, i valori fps (fotogrammi per secondo), l’ampiezza del campo visivo, il bilanciamento del bianco, i livelli di esposizione e altro ancora. Attivando la funzione Protune, i video possono sembrare meno definiti e i colori più sbiaditi rispetto a quelli girati con le impostazioni predefinite. The feature basically gives professional users a sort of "white sheet" to work more freely on videos in post-production.

Perfect videos in any situation
Tags save time
There is a system that allows, especially when a video is very long, to go straight to the highlights by adding so-called HiLight Tags while shooting. A very useful feature when you want to not waste the time of those you want to show the footage to. Here's how it works. You can add HiLight Tags in three different ways while recording: by pressing the Settings/Tag button on the side of the GoPro, the Settings/Tag button on the Smart Remote (the remote control), or the HiLight Tag icon in the GoPro app for smartphones or desktops. Quando il filmato viene copiato e sincronizzato sul computer tramite il programma GoPro per computer, saranno “etichettati” tutti quelli in cui è stato impostato un tag. Le sezioni “in evidenza” sono riconoscibili da un indicatore arancione. Il procedimento è simile anche per chi usa il programma GoPro Studio.
Rivivere le emozioni al rallentatore
È conosciuta in gergo come registrazione in time-lapse. Si tratta di una tecnica di videoripresa temporizzata che permette di riprendere dei fotogrammi video a intervalli di tempo prestabiliti senza la necessità di scattare tante foto in sequenza. La videocamera, al termine della registrazione, si preoccuperà di assemblare automaticamente tutti i singoli frame da riprodurre – sotto forma di un filmato al rallentatore – sul touchscreen della videocamera, tramite l’applicazione GoPro, oppure sul televisore o il computer.
Video perfetti con lo stabilizzatore
 Fonte foto: Web
Video stabilizzati anche nelle situazioni più difficili
Ci sono situazione in cui tenere ben ferme le mani è impossibile. Una soluzione potrebbe essere appoggiare la videocamera contro il mento o, ancora meglio, acquistare uno dei modelli di stabilizzatore professionale progettati appositamente per le videocamere GoPro. Chi dispone del modello Hero5 può provare lo stabilizzatore video incorporato prima di decidere di comprarne uno “fisico”.
L’effetto slow-motion o fast-motion alla portata di tutti
Le videocamere GoPro offrono una serie di impostazioni relative al frame rate, ossia alla frequenza di registrazione dei fotogrammi. Imparare a gestirli al meglio può avere un reale impatto sulla qualità dei filmati. Un frame rate molto elevato è in grado di conferire più “adrenalina” a un video, mentre uno più basso – magari a risoluzioni più elevate – si rivela ideale in condizioni di scarsa illuminazione. Ogni situazione è diversa, quindi, è necessario sperimentare varie combinazioni sul campo per prendere dimestichezza con le impostazioni fino a ottenere video sempre più originali e di migliore qualità. Per un buon video in slow-motion, per esempio, si potrebbe partire con una risoluzione di 1080p a 120 fps (fotogrammi al secondo).
I filtri che fanno la differenza
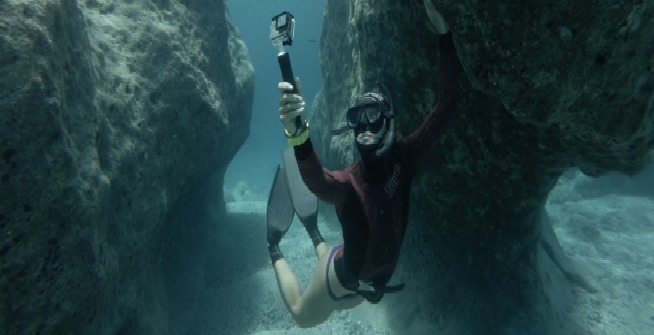
La GoPro ideale per chi ama le immersioni
Esistono numerosi accessori progettati per tutti i modelli di GoPro e, tra questi, anche filtri. Si tratta di lenti particolari che, non solo proteggono l’obbiettivo, ma provvedono a correggere il colore durante l’acquisizione dei video. Due esempi per tutti. Scuba diving enthusiasts usually use a special filter to counteract the color of the water, but the same is true if you're trying to reduce glare from snow or reflective surfaces as much as possible.
Lens maintenance is a must
A fingertip or a coating of dust on the lens can happen to anyone, especially when shooting reckless video in wild environments. Cleaning your lens should become a habit, preferably before every shoot. The most effective method is to breathe lightly on the lens so as to mist it and then dry it with a soft, clean cloth, repeating the operation until the lens is completely clean. Avoid using ordinary household cleaning products because they can seriously damage the lens.